US English (US)
FR French
JP Japanese
BR Portuguese (Brazil)
CN Chinese
MX Spanish (Mexico)

Contact Us

If you still have questions or prefer to get help directly from an agent, please submit a request.
We’ll get back to you as soon as possible.

Please fill out the contact form below and we will reply as soon as possible.

  • Log in
English (US)
US English (US)
FR French
JP Japanese
BR Portuguese (Brazil)
CN Chinese
MX Spanish (Mexico)
  • Home
  • Hardware
  • Staff Tech

Printer Installation

Instruction for printer installation at BCSC

Written by Anastasia Martindale

Updated at October 16th, 2024

Contact Us

If you still have questions or prefer to get help directly from an agent, please submit a request.
We’ll get back to you as soon as possible.

Please fill out the contact form below and we will reply as soon as possible.

  • Accounts/Permissions
  • Connectivity
    Wireless Networks BYOD (Bring Your Own Device)
  • eLearning
  • Email
  • Google
    Summer EdTech PD
  • Hardware
    Staff Tech Student Tech Other Chromebooks DocCam iPads Printers Visual Display
  • Resources
    Teacher Classified Staff Administrator Student
  • Support Ticket
  • Software
    Web Browser Productivity Accessibility Video Conferencing Assessment ParentSquare LLLOW PowerSchool Skyward Frontline Aesop Destiny
  • Teacher Resources
  • Human Resources
  • BCSC Transportation
    EZ Routing Routing and Planning
  • Phones
  • Food Service
  • Administrative Assistants Meeting
  • Canvas Learning Management System
  • Safety and Security
+ More

Table of Contents

Printer Installation

Audience: All staff

System Preference: Windows  

WL3

Printer Installation

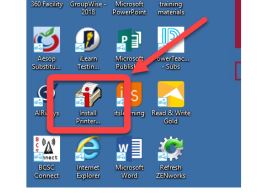
  1. Click the Install Printers icon on the desktop or use this link to navigate to the printer install websiteInstall printer icon on the desktop
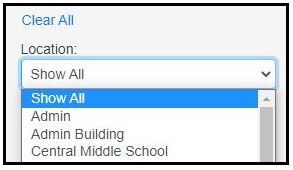
  2. At the location drop down menu select your schoolLocation selection in Print Installation website. Location: Show all, Admin, Admin Building, Central Middle School
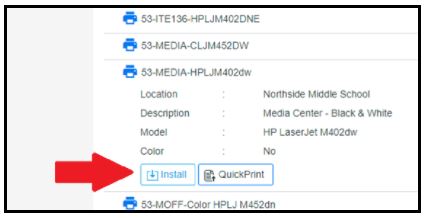
  3. Find the printer you want to install. If you click on the printer it will show a description of the printer. 
  4. example: 53-MEDIA-HPJM402dw   
  5. Click the Install buttonPrinter Installation menu with an arrow pointing at Install button on the bottom of the menu
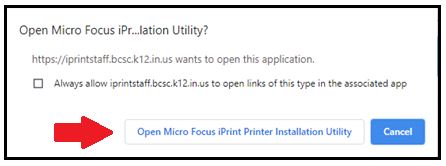
  6. At the pop up click the button Open Micro Focus iPrint Printer Installation Utility. Arrow pointing to Open Micro Focus iPrint Printer Installation Utility button on bottom left.
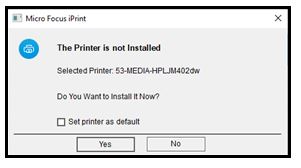
  7. At the next pop up window select Yes to install the printer. Check Set printer as default if you want this printer automatically selected for printing in the future. Printer installation pop up - The printer is not installed. Do you want to install it now? Yes/NoPrinter installation pop up - The printer is not installed. Do you want to install it now? Yes/No
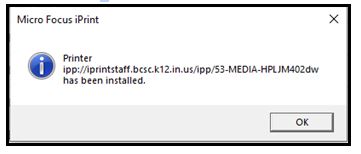
  8. Once complete click OK.Micro Focus iPrint - printer has been installed confirmation


Your browser does not support HTML5 video.


network printer printer setup

Was this article helpful?

Yes
No
Give feedback about this article

Related Articles

  • Adjusting an image on the SMART Board

Visit Us

BCSC CRISIS HOTLINE: (812) 379-7710

1200 Central Avenue

Columbus, IN 47201

Get Directions

Contact Us

Phone: (812) 376-4234

Fax: (812) 376-4486

Email Us

  • Site Map
  • Apply For A Job
  • Accessibility Statement
  • IDOE- INview
  • Configurable Footer Link
  • Configurable Footer Link
Bartholomew Consolidated School Corporation does not condone or tolerate systemic racism of any kind. BCSC values inclusion and diversity. As a community we must stand together to end racism. We believe in a school community where everyone feels safe and valued.
Blackboard, Inc. All rights reserved.
  • Questions or Feedback?
  • Terms of Use
  • Blackboard Web Community Manager Privacy Policy (Updated)
Copyright © 2002-2021 Blackboard, Inc. All rights reserved.

Definition by Author

0
0
Expand