US English (US)
JP Japanese
BR Portuguese (Brazil)
CN Chinese
MX Spanish (Mexico)

Contact Us

If you still have questions or prefer to get help directly from an agent, please submit a request.
We’ll get back to you as soon as possible.

Please fill out the contact form below and we will reply as soon as possible.

  • Log in
English (US)
US English (US)
JP Japanese
BR Portuguese (Brazil)
CN Chinese
MX Spanish (Mexico)
  • Home
  • Hardware
  • Staff Tech

Staff Laptop - First Time Login

First Time Login and Setup for Staff Windows Laptops

Written by Anastasia Martindale

Updated at October 28th, 2022

Contact Us

If you still have questions or prefer to get help directly from an agent, please submit a request.
We’ll get back to you as soon as possible.

Please fill out the contact form below and we will reply as soon as possible.

  • Accounts/Permissions
  • Connectivity
    Wireless Networks BYOD (Bring Your Own Device)
  • eLearning
  • Email
  • Google
  • Hardware
    Staff Tech Student Tech Other Chromebooks
  • ItsLearning
  • New Employee
    Teacher Support Staff Administrator Student
  • Support Ticket
  • Software
    Web Browser Productivity Accessibility Video Conferencing Assessment ParentSquare LLLOW PowerSchool Skyward
  • Teacher Resources
    Teacher Trainings
  • Human Resources
  • BCSC Transportation
    EZ Routing Routing and Planning
  • Phones
  • Notices
  • Food Service
  • Administrative Assistants Meeting
+ More

Audience: Staff

System Preference: Windows

Summer 2022 - Newly Reimaged Windows Laptops

Follow these instructions when picking up your newly imaged Windows laptop including STEP 1 which should be completed before leaving the building.


  1. Log on to the laptop before leaving the building. This initial login could take 5-10 minutes or longer as settings are being established on your laptop. Please allow plenty of time for your laptop to finish its initial boot up.


  1. Set default browser to Chrome:
    1. Click the Start window
      Windows Start icon - white Windows logo on black background
    2. Go to SettingsSettings icon - a white cog on black background
    3. Click on AppsApps icons in Settings - Apps (Uninstall, defaults, optional, features)
    4. Click on Default AppsApps selection - Apps & Features; Default Apps; Offline Maps; Apps for Websites
    5. Click on Web Browser and change it to Google ChromeWeb browser selection - Google Chrome


  1. Set default PDF reader to Adobe:
    1. Click the Start windowWindows Start icon - white Windows logo on black background
    2. Go to SettingsSettings icon - a white cog on black background
    3. Click on AppsApps icons in Settings - Apps (Uninstall, defaults, optional, features)
    4. Click on Default AppsApps selection - Apps & Features; Default Apps; Offline Maps; Apps for Websites
    5. Click on Set defaults by appDefaults menu - Choose default apps by file type; Choose default apps by protocol; Set defaults by app
    6. Click on Adobe Acrobat Reader DC and then click ManagePDF default applications - 3D Viewer, Access 2016, Adobe Acrobat Reader DC
    7. Find .pdf and click on the Microsoft Edge iconPDF Adobe Acrobat Document default app - Microsoft Edge selected
    8. Change to Adobe Acrobat Reader DCAdobe Acrobat Reader DC icon


  1. The copiers in the building have already been installed on this laptop. To install printers:
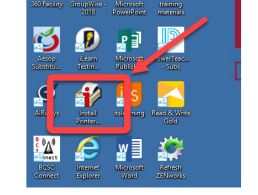
    1. Click the Install Printers icon on the desktop or use this link to navigate to the printer install websiteInstall printer icon on the desktop
    2. Click the Advanced buttonAlert - Your connection is not private. Arrow points to Advanced button on lower left.
    3. Click the link Proceed to iprintstaff.bcsc.k12.in.us (unsafe)Security alert with the following selection marked in red: Proceed to iprintstaff.bcsc.k12.in.us (unsafe)
    4. At the location drop down menu select your schoolLocation selection in Print Installation website. Location: Show all, Admin, Admin Building, Central Middle School
    5. Find the printer you want to install. If you click on the printer it will show a description of the printer. 
    6. Click the Install buttonPrinter Installation menu with an arrow pointing at Install button on the bottom of the menu
    7. At the pop up click the button Open Micro Focus iPrint Printer Installation Utility. Arrow pointing to Open Micro Focus iPrint Printer Installation Utility button on bottom left.
    8. At the next pop up window select Yes to install the printer. Check Set printer as default if you want this printer automatically selected for printing in the future. Printer installation pop up - The printer is not installed. Do you want to install it now? Yes/No
    9. Once complete click OK.Micro Focus iPrint - printer has been installed confirmation
  2. To be completed at home/away from BCSC - to log in when off of the BCSC network choose "Computer Only Logon". Then, use your Novell username and password to "Log on to this computer".Left: Log on to OES Network, Computer Only Logon highlighted. Right: Log on to this computer login screen with username and password fields.
first login printer install default

Was this article helpful?

Yes
No
Give feedback about this article

Related Articles

  • Printer Installation
  • Adjusting Audio Settings (Windows 10)

Visit Us

BCSC CRISIS HOTLINE: (812) 379-7710

1200 Central Avenue

Columbus, IN 47201

Get Directions

Contact Us

Phone: (812) 376-4234

Fax: (812) 376-4486

Email Us

  • Site Map
  • Apply For A Job
  • Accessibility Statement
  • IDOE- INview
  • Configurable Footer Link
  • Configurable Footer Link
Bartholomew Consolidated School Corporation does not condone or tolerate systemic racism of any kind. BCSC values inclusion and diversity. As a community we must stand together to end racism. We believe in a school community where everyone feels safe and valued.
Blackboard, Inc. All rights reserved.
  • Questions or Feedback?
  • Terms of Use
  • Blackboard Web Community Manager Privacy Policy (Updated)
Copyright © 2002-2021 Blackboard, Inc. All rights reserved.

Definition by Author

0
0
Expand